Star trails over the planned site of the Giant Magellan Telescope in the Atacama Desert in Chile. Image via Yuri Beletsky Nightscapes.
Star trails are the continuous paths created by stars, produced during long-exposure photographs, as shown on this page. In other words, the camera doesn’t track along with the stars’ apparent motion as night passes. Instead, the camera stays fixed, while, as the hours pass, the stars move. The resulting photos show the nightly movement of stars on the sky’s dome.
Star trails reflect Earth’s rotation, or spin, on its axis. The Earth rotates full circle relative to the backdrop stars in a period of about 23 hours and 56 minutes. So, as seen from Earth, all the stars go full circle and return to the same place in sky after this period of time, which astronomers call a sidereal (stellar) day.

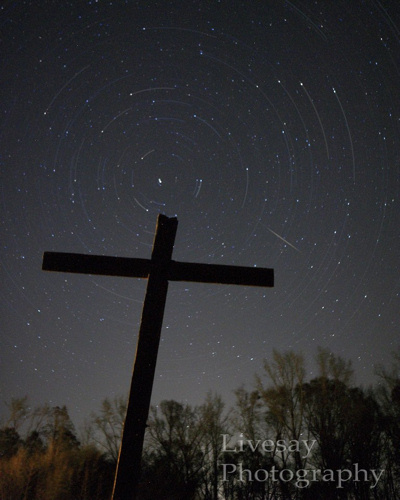
View larger. | Star trails (plus meteor) photo taken by Guy Livesay. Thank you, Guy! If you aim your camera northward in a long-exposure photo, the star trails will be seen to track around the north celestial pole. In fact, the stars move counter-clockwise around the sky’s north pole in the course of every night.

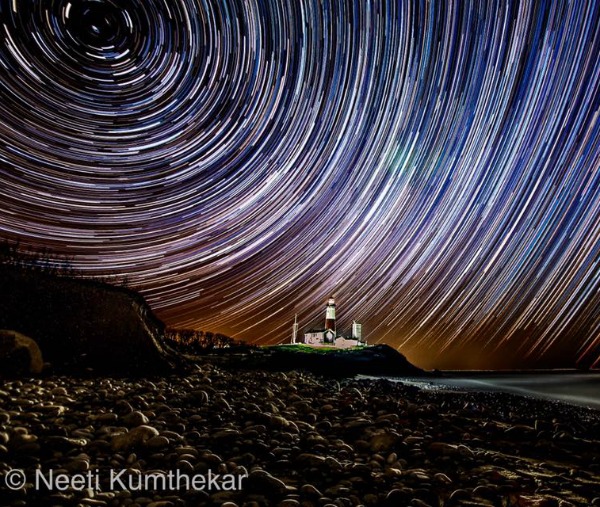
Montauk Point lighthouse. Photo via Neeti Kumthekar.
What this means is that, if you’re standing out under the stars, you see them move across the sky as night passes. Stars rise in the east, arc across the sky and set in the west, just as the sun does.
Stars near the celestial poles produce the smallest circles while those near the celestial equator produce the largest. The stars – like the sun during the daytime – move from east to west across the sky each and every night. Each and every star moves 15 degrees westward in one hour.
Star trails are really arcs, or partial circles, whose ever-circling motions forever tabulate the great passage of time.
Sometimes you can get cool non-star effects into your shot, as Michael A. Rosinski did in this photo.
Ken Christison captured these glorious star trails around Polaris, the North Star. He wrote, “For the most common and often the most spectacular star trails, you want to locate Polaris and compose the image so it is centered horizontally and hopefully you can have a bit of foreground for reference.”
EarthSky Facebook friend Ken Christison has some wonderful photos of star trails. He said the equipment needed for making startrails is pretty simple:
First, a camera that allows manual settings so you can set your f/stop and shutter speeds, as well as ISO.
Next, a wide angle lens, the wider the better.
A good steady tripod is a must.
Some cameras will have a built in intervalometer which can be set to shoot the desirable number of frames. In some cases the intervalometer has a bit of lag between shots, which is the reason I use a separate, remote attached to the camera that holds the shutter down and when the camera is set in continuous shooting mode will shoot 100 frames in succession with very little gap.
The remote I use is a simple one that can be found on eBay and uses a couple AAA batteries that last quite a while. I just use the remote controller attached to the 10 pin connector. There is no need to use the wireless receiver in this case.
I use a shutter speed of 30 seconds, ISO of 400 to 800, and with my 14-24mm lens at 14mm, shoot it wide open at f/2.8.
Next, he said, you’re ready to capture your star trail:
Make sure the camera is level, and after focusing on a star, make sure the autofocus is turned off. Then, using the settings mentioned above, click the shutter and stay around long enough to know that the shutter is actually actuating. I normally go back in the house, set the timer on our kitchen stove for 45 minutes, and do other things while the camera does its work.
When the timer sounds, go back out and reset the remote by turning it off, waiting for the shutter to close, then reset quickly.
Finally, you’ll want to process your photo. Ken said:
This is one of the most important elements in making star trail images. The program I use is free, works well and is simple to use: http://www.startrails.de/html/software.html.
One other program that I have heard works well and is also free is StarStax: http://www.markus-enzweiler.de/software/software.html.
Thank you, Ken!
Visit Ken Christison’s Flickr page.
Read more: Long exposure star trail photography
A 2-hour-and-15-minute star trail image from March 21, 2014. Our friend Ken Christison in North Carolina captured this image. Want to see what a single frame of this image looked like? See the photo below.
A single frame of the star trail image above, with the elements labeled. Thank you, Ken Christison of Conway, North Carolina!

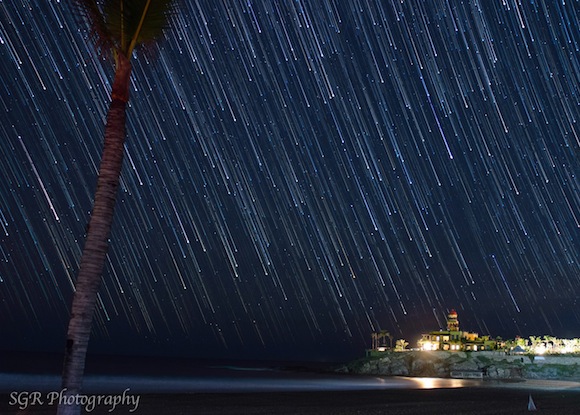
Composite image of star trails over Baja, California, from EarthSky Facebook friend Sergio Garcia Rill. This image is the product of 80 separate photographs. Thank you, Sergio!
You can also create a star trail of sorts with our local star, the sun. EarthSky Facebook friend Matthew Chin in Hong Kong created this sun trail on October 5, 2013. Thank you, Matthew!

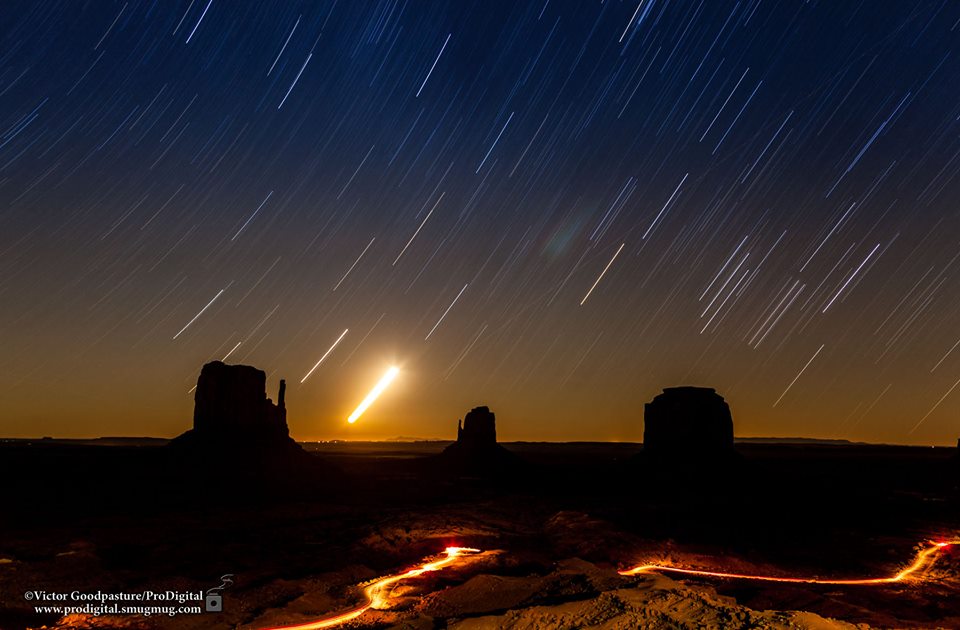
View larger. | Or you can create a moon trail. Star trails and moon trail over Monument Valley from Victor Goodpasture. The bright object is the moon. See more from Victor at Professional Digital Photography on Facebook.
Bottom line: Star trails are the continuous paths created by stars, produced during long time exposure photographs, as shown in the photos on this page.
from EarthSky http://ift.tt/2cdDIYy
Star trails over the planned site of the Giant Magellan Telescope in the Atacama Desert in Chile. Image via Yuri Beletsky Nightscapes.
Star trails are the continuous paths created by stars, produced during long-exposure photographs, as shown on this page. In other words, the camera doesn’t track along with the stars’ apparent motion as night passes. Instead, the camera stays fixed, while, as the hours pass, the stars move. The resulting photos show the nightly movement of stars on the sky’s dome.
Star trails reflect Earth’s rotation, or spin, on its axis. The Earth rotates full circle relative to the backdrop stars in a period of about 23 hours and 56 minutes. So, as seen from Earth, all the stars go full circle and return to the same place in sky after this period of time, which astronomers call a sidereal (stellar) day.

View larger. | Star trails (plus meteor) photo taken by Guy Livesay. Thank you, Guy! If you aim your camera northward in a long-exposure photo, the star trails will be seen to track around the north celestial pole. In fact, the stars move counter-clockwise around the sky’s north pole in the course of every night.

Montauk Point lighthouse. Photo via Neeti Kumthekar.
What this means is that, if you’re standing out under the stars, you see them move across the sky as night passes. Stars rise in the east, arc across the sky and set in the west, just as the sun does.
Stars near the celestial poles produce the smallest circles while those near the celestial equator produce the largest. The stars – like the sun during the daytime – move from east to west across the sky each and every night. Each and every star moves 15 degrees westward in one hour.
Star trails are really arcs, or partial circles, whose ever-circling motions forever tabulate the great passage of time.
Sometimes you can get cool non-star effects into your shot, as Michael A. Rosinski did in this photo.
Ken Christison captured these glorious star trails around Polaris, the North Star. He wrote, “For the most common and often the most spectacular star trails, you want to locate Polaris and compose the image so it is centered horizontally and hopefully you can have a bit of foreground for reference.”
EarthSky Facebook friend Ken Christison has some wonderful photos of star trails. He said the equipment needed for making startrails is pretty simple:
First, a camera that allows manual settings so you can set your f/stop and shutter speeds, as well as ISO.
Next, a wide angle lens, the wider the better.
A good steady tripod is a must.
Some cameras will have a built in intervalometer which can be set to shoot the desirable number of frames. In some cases the intervalometer has a bit of lag between shots, which is the reason I use a separate, remote attached to the camera that holds the shutter down and when the camera is set in continuous shooting mode will shoot 100 frames in succession with very little gap.
The remote I use is a simple one that can be found on eBay and uses a couple AAA batteries that last quite a while. I just use the remote controller attached to the 10 pin connector. There is no need to use the wireless receiver in this case.
I use a shutter speed of 30 seconds, ISO of 400 to 800, and with my 14-24mm lens at 14mm, shoot it wide open at f/2.8.
Next, he said, you’re ready to capture your star trail:
Make sure the camera is level, and after focusing on a star, make sure the autofocus is turned off. Then, using the settings mentioned above, click the shutter and stay around long enough to know that the shutter is actually actuating. I normally go back in the house, set the timer on our kitchen stove for 45 minutes, and do other things while the camera does its work.
When the timer sounds, go back out and reset the remote by turning it off, waiting for the shutter to close, then reset quickly.
Finally, you’ll want to process your photo. Ken said:
This is one of the most important elements in making star trail images. The program I use is free, works well and is simple to use: http://www.startrails.de/html/software.html.
One other program that I have heard works well and is also free is StarStax: http://www.markus-enzweiler.de/software/software.html.
Thank you, Ken!
Visit Ken Christison’s Flickr page.
Read more: Long exposure star trail photography
A 2-hour-and-15-minute star trail image from March 21, 2014. Our friend Ken Christison in North Carolina captured this image. Want to see what a single frame of this image looked like? See the photo below.
A single frame of the star trail image above, with the elements labeled. Thank you, Ken Christison of Conway, North Carolina!

Composite image of star trails over Baja, California, from EarthSky Facebook friend Sergio Garcia Rill. This image is the product of 80 separate photographs. Thank you, Sergio!
You can also create a star trail of sorts with our local star, the sun. EarthSky Facebook friend Matthew Chin in Hong Kong created this sun trail on October 5, 2013. Thank you, Matthew!

View larger. | Or you can create a moon trail. Star trails and moon trail over Monument Valley from Victor Goodpasture. The bright object is the moon. See more from Victor at Professional Digital Photography on Facebook.
Bottom line: Star trails are the continuous paths created by stars, produced during long time exposure photographs, as shown in the photos on this page.
from EarthSky http://ift.tt/2cdDIYy

Aucun commentaire:
Enregistrer un commentaire